写在前面
先分享一首数摇:
其次是:对于identityServer理解并不是特别深刻,目前只是能简单的应用,里面一些具体设置以后可能慢慢更新到本文中。
最后:一张大图

IdentityServer4基于.net core的OAuth2.0和OpenId框架,主要应用于身份验证,单点登录,API访问控制等。。。
IdentityServer4 文档:
IdentityServer4 GitHub:
本文demo:
api访问控制
一.首先需要创建授权中心,
新建.net core Web Application 项目,模板可以选择空或者web应用程序,偷懒的话直接选择web就好了
1.在project.json里添加 "IdentityServer4": "1.0.0",nuget添加一样可以。
2.我们需要新建一个配置文件configs.cs定义client和api作用域及账号信息具体代码如下:


public static IEnumerableGeyApiResources() { return new List { new ApiResource("UserApi","用户API") }; } public static IEnumerable GetClients() { return new List { new Client { ClientId = "Client", AllowedGrantTypes = GrantTypes.ClientCredentials, ClientSecrets = { new Secret("secret".Sha256()) }, AllowedScopes = { "UserApi"} }, new Client { ClientId = "ro.Client", AllowedGrantTypes = GrantTypes.ResourceOwnerPassword, ClientSecrets = { new Secret("secret".Sha256()) }, AllowedScopes = { "UserApi"} }, // OpenID Connect implicit flow client (MVC) new Client { ClientId = "MVC", ClientName = "MVC Client", AllowedGrantTypes = GrantTypes.HybridAndClientCredentials, ClientSecrets = { new Secret("secret".Sha256()) }, RedirectUris = { "http://localhost:5002/signin-oidc" }, PostLogoutRedirectUris = { "http://localhost:5002" }, AllowedScopes = { IdentityServerConstants.StandardScopes.OpenId, IdentityServerConstants.StandardScopes.Profile, "UserApi" }, AllowOfflineAccess = true }, // JavaScript Client new Client { ClientId = "js", ClientName = "JavaScript Client", AllowedGrantTypes = GrantTypes.Implicit, AllowAccessTokensViaBrowser = true, RedirectUris = { "http://localhost:5003/callback.html" }, PostLogoutRedirectUris = { "http://localhost:5003/index.html" }, AllowedCorsOrigins = { "http://localhost:5003" }, AllowedScopes = { IdentityServerConstants.StandardScopes.OpenId, IdentityServerConstants.StandardScopes.Profile, "UserApi" }, } }; } public static List GeTestUsers() { return new List { new TestUser { SubjectId = "1", Username = "qwerty", Password = "a123" }, new TestUser { SubjectId = "2", Username = "aspros", Password = "b123" } }; }
3.在startup文件ConfigureServices里配置服务,Configure使用identityserver
public void ConfigureServices(IServiceCollection services) { // Add framework services. services.AddApplicationInsightsTelemetry(Configuration); services.AddIdentityServer() .AddTemporarySigningCredential() .AddInMemoryApiResources(Configs.GeyApiResources()) .AddInMemoryClients(Configs.GetClients()) .AddTestUsers(Configs.GeTestUsers()); services.AddMvc(); } public void Configure(IApplicationBuilder app, IHostingEnvironment env, ILoggerFactory loggerFactory) { loggerFactory.AddConsole(Configuration.GetSection("Logging")); loggerFactory.AddDebug(); app.UseApplicationInsightsRequestTelemetry(); if (env.IsDevelopment()) { app.UseDeveloperExceptionPage(); app.UseBrowserLink(); } else { app.UseExceptionHandler("/Home/Error"); } app.UseApplicationInsightsExceptionTelemetry(); app.UseStaticFiles();//使用userIdentityServer app.UseIdentityServer(); app.UseMvc(routes => { routes.MapRoute( name: "default", template: "{controller=Home}/{action=Index}/{id?}"); }); } 4.更改当前应用程序的端口为:8000 (可略过)
以上,基本授权中心配置完毕
二.添加测试使用的api
新建.net core Web Application,模板使用Api
1.在project.json里添加 "IdentityServer4.AccessTokenValidation": "1.0.1", "Microsoft.AspNetCore.Cors": "1.1.0"(为跨域访问api做准备)
2.在Startup文件里添加跨域服务,配置授权中心地址及scope api作用域
public void ConfigureServices(IServiceCollection services) { // Add framework services. services.AddApplicationInsightsTelemetry(Configuration); #region 跨域 services.AddCors(options => { // this defines a CORS policy called "default" options.AddPolicy("default", policy => { policy.WithOrigins("http://localhost:5003") .AllowAnyHeader() .AllowAnyMethod(); }); }); #endregion services.AddMvcCore() .AddAuthorization() .AddJsonFormatters(); } public void Configure(IApplicationBuilder app, IHostingEnvironment env, ILoggerFactory loggerFactory) { loggerFactory.AddConsole(Configuration.GetSection("Logging")); loggerFactory.AddDebug(); //配置identityServer授权 app.UseIdentityServerAuthentication(new IdentityServerAuthenticationOptions { Authority = "http://localhost:8000", AllowedScopes = { "UserApi" }, RequireHttpsMetadata = false }); //跨域访问 app.UseCors("default"); app.UseMvc(); } 注释:cors可以暂时不配置,不影响后面调试
3.在controller上添加 [Authorize]
[Authorize] [Route("api/[controller]")] public class ValuesController : Controller { [HttpGet] public IActionResult Get() { //return Content("a"); return new JsonResult(from c in User.Claims select new { c.Type, c.Value }); } } 4.更改api端口号,5001
以上测试使用Api暂时配置完毕
三.单元测试
新建.net core 类库
1.在project.json里添加
"dotnet-test-xunit": "2.2.0-preview2-build1029",
"IdentityModel": "2.1.1", "xunit": "2.2.0-beta4-build3444", "xunit.runner.console": "2.2.0-beta2-build3300"具体如下:
{ "version": "1.0.0-*", "testRunner": "xunit", "dependencies": { "dotnet-test-xunit": "2.2.0-preview2-build1029", "IdentityModel": "2.1.1", "xunit": "2.2.0-beta4-build3444", "xunit.runner.console": "2.2.0-beta2-build3300" }, "frameworks": { "netcoreapp1.0.1": { "dependencies": { "Microsoft.NETCore.App": { "type": "platform", "version": "1.0.1" } } } }} 2.新建测试类,UserClientTest,代码如下
public class UserClientTest { [Fact] public async Task ClientApiTest() { //get access_token var disco = await DiscoveryClient.GetAsync("http://localhost:8000"); var tokenClient = new TokenClient(disco.TokenEndpoint, "Client", "secret"); var tokenResponse = await tokenClient.RequestClientCredentialsAsync("UserApi"); var client = new HttpClient(); client.SetBearerToken(tokenResponse.AccessToken);//add bearer with access_token var response = await client.GetAsync("http://localhost:5001/api/Values");//call API with access_token var apiResult = response.Content.ReadAsStringAsync().Result; Assert.NotEmpty(apiResult); } [Fact] public async Task PasswordApiTests() { var disco = await DiscoveryClient.GetAsync("http://localhost:8000"); var tokenClient = new TokenClient(disco.TokenEndpoint, "ro.Client", "secret"); var tokenResponse = await tokenClient.RequestResourceOwnerPasswordAsync("qwerty", "a123", "UserApi"); var client = new HttpClient(); client.SetBearerToken(tokenResponse.AccessToken);//add bearer with access_token var response = await client.GetAsync("http://localhost:5001/api/Values");//call API with access_token var apiResult = response.Content.ReadAsStringAsync().Result; Assert.NotEmpty(apiResult); } } 调试,
1请求授权中心,带入clientId,secret,scope作用域(api) 得到access_token
2得到access_token后,在header里添加Authorization:Bearer+access_token 请求api
3返回结果
OpenId 连接的mvc用户认证
一.授权中心更改的地方:
1.在授权中心里config里添加IdentityResource
public static IEnumerableGetyIdentityResources() { return new List { new IdentityResources.OpenId(), new IdentityResources.Profile() }; }
2.config=》client里添加mvc
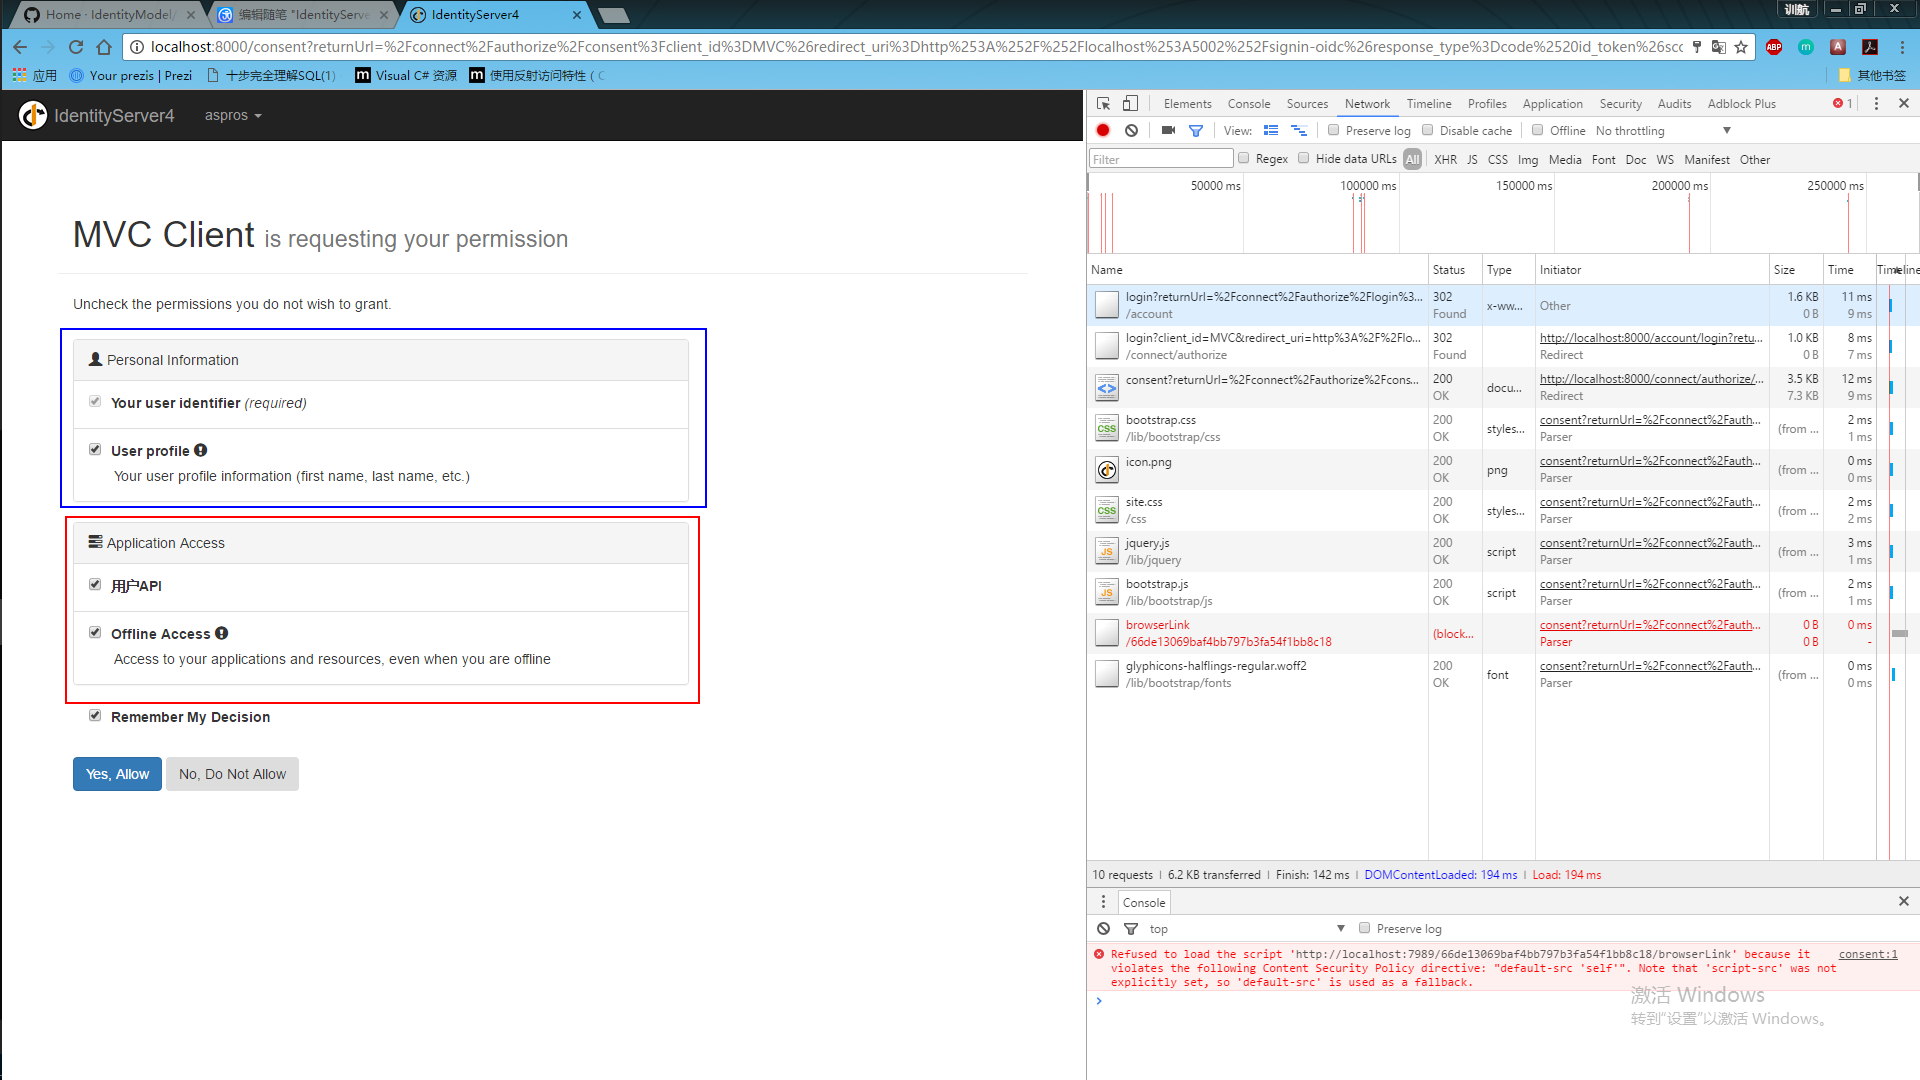
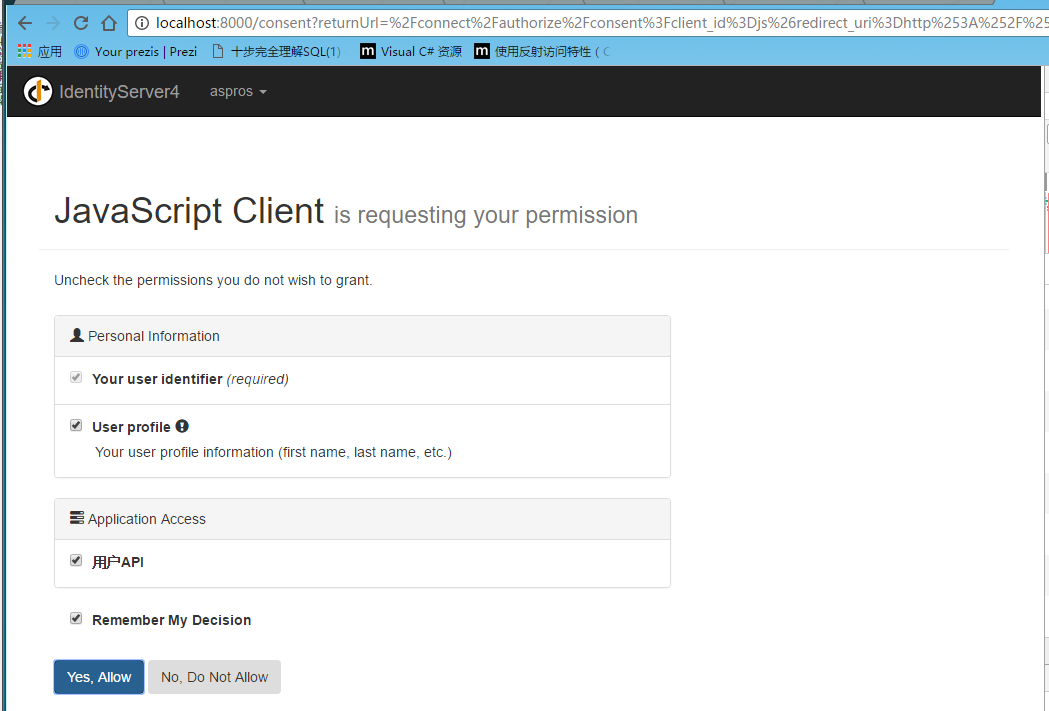
new Client { ClientId = "MVC", ClientName = "MVC Client", AllowedGrantTypes = GrantTypes.HybridAndClientCredentials, ClientSecrets = { new Secret("secret".Sha256()) }, RedirectUris = { "http://localhost:5002/signin-oidc" }, PostLogoutRedirectUris = { "http://localhost:5002" }, AllowedScopes = { IdentityServerConstants.StandardScopes.OpenId, IdentityServerConstants.StandardScopes.Profile, "UserApi" }, AllowOfflineAccess = true }, (AllowedScopes 设置授权范围,加上“UserApi” 及AllowOfflineAccess = true 后,在授权中心登录验证通过后,显示对应访问权限)
3.在startup里添加 AddInMemoryIdentityResources方法
public void ConfigureServices(IServiceCollection services) { // Add framework services. services.AddApplicationInsightsTelemetry(Configuration); services.AddIdentityServer() .AddTemporarySigningCredential() .AddInMemoryApiResources(Configs.GeyApiResources()) .AddInMemoryClients(Configs.GetClients()) .AddInMemoryIdentityResources(Configs.GetyIdentityResources()) .AddTestUsers(Configs.GeTestUsers()); services.AddMvc(); } (这里我出现过一个问题,在添加顺序的时候,将IdentityResources方法写在前面,单元测试请求api的时候会出现httpstatue 500错误)
4.添加UI
可以在github下载 https://github.com/IdentityServer/IdentityServer4.Quickstart.UI/tree/release
(涉及到的页面及viewmodel较多。demo里我也重新整理过了)
以上,授权中心部分修改完毕
二.mvc客户端
添加.net core web application 选择web应用程序
1.在project.json 里添加
"Microsoft.AspNetCore.Authentication.Cookies": "1.0.*",
"Microsoft.AspNetCore.Authentication.OpenIdConnect": "1.0.*", "IdentityModel": "2.1.1"
2.在startup里添加UseCookieAuthentication,UseOpenIdConnectAuthentication,代码如下
public void Configure(IApplicationBuilder app, IHostingEnvironment env, ILoggerFactory loggerFactory) { JwtSecurityTokenHandler.DefaultInboundClaimTypeMap.Clear(); loggerFactory.AddConsole(Configuration.GetSection("Logging")); loggerFactory.AddDebug(); if (env.IsDevelopment()) { app.UseDeveloperExceptionPage(); } else { app.UseExceptionHandler("/Home/Error"); } app.UseCookieAuthentication(new CookieAuthenticationOptions { AuthenticationScheme = "Cookies" }); app.UseOpenIdConnectAuthentication(new OpenIdConnectOptions { AuthenticationScheme = "oidc", SignInScheme = "Cookies", Authority = "http://localhost:8000", RequireHttpsMetadata = false, ClientId = "MVC", ClientSecret = "secret", ResponseType = "code id_token", Scope = { "UserApi", "offline_access" },//添加权限请求项 GetClaimsFromUserInfoEndpoint = true, SaveTokens = true }); app.UseStaticFiles(); app.UseMvcWithDefaultRoute(); } 注意的地方,Authority为授权中心地址,ClientId与授权中心config里client里保持一致。Scope为请求权限项
3.在action上加上[Authorize],启用授权
4.更改端口为5002,可自行调节,需要与config保持一致
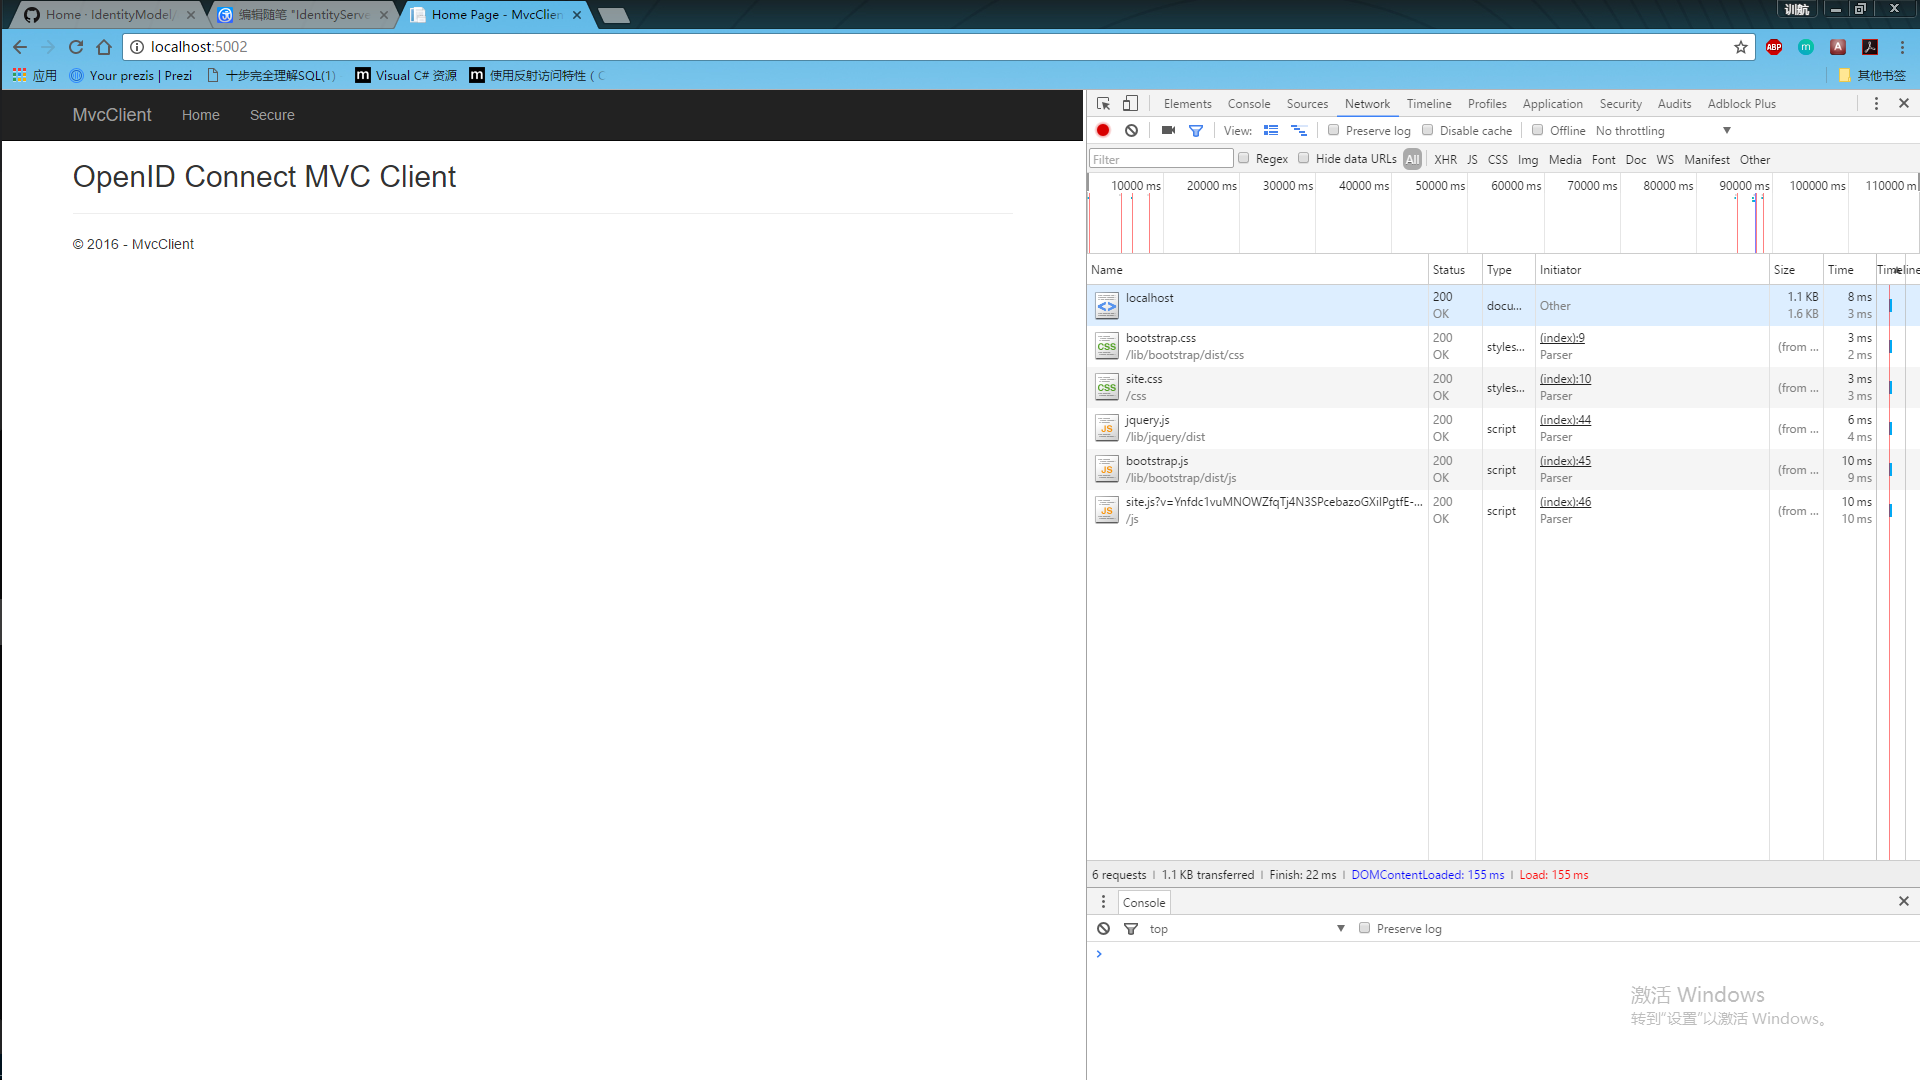
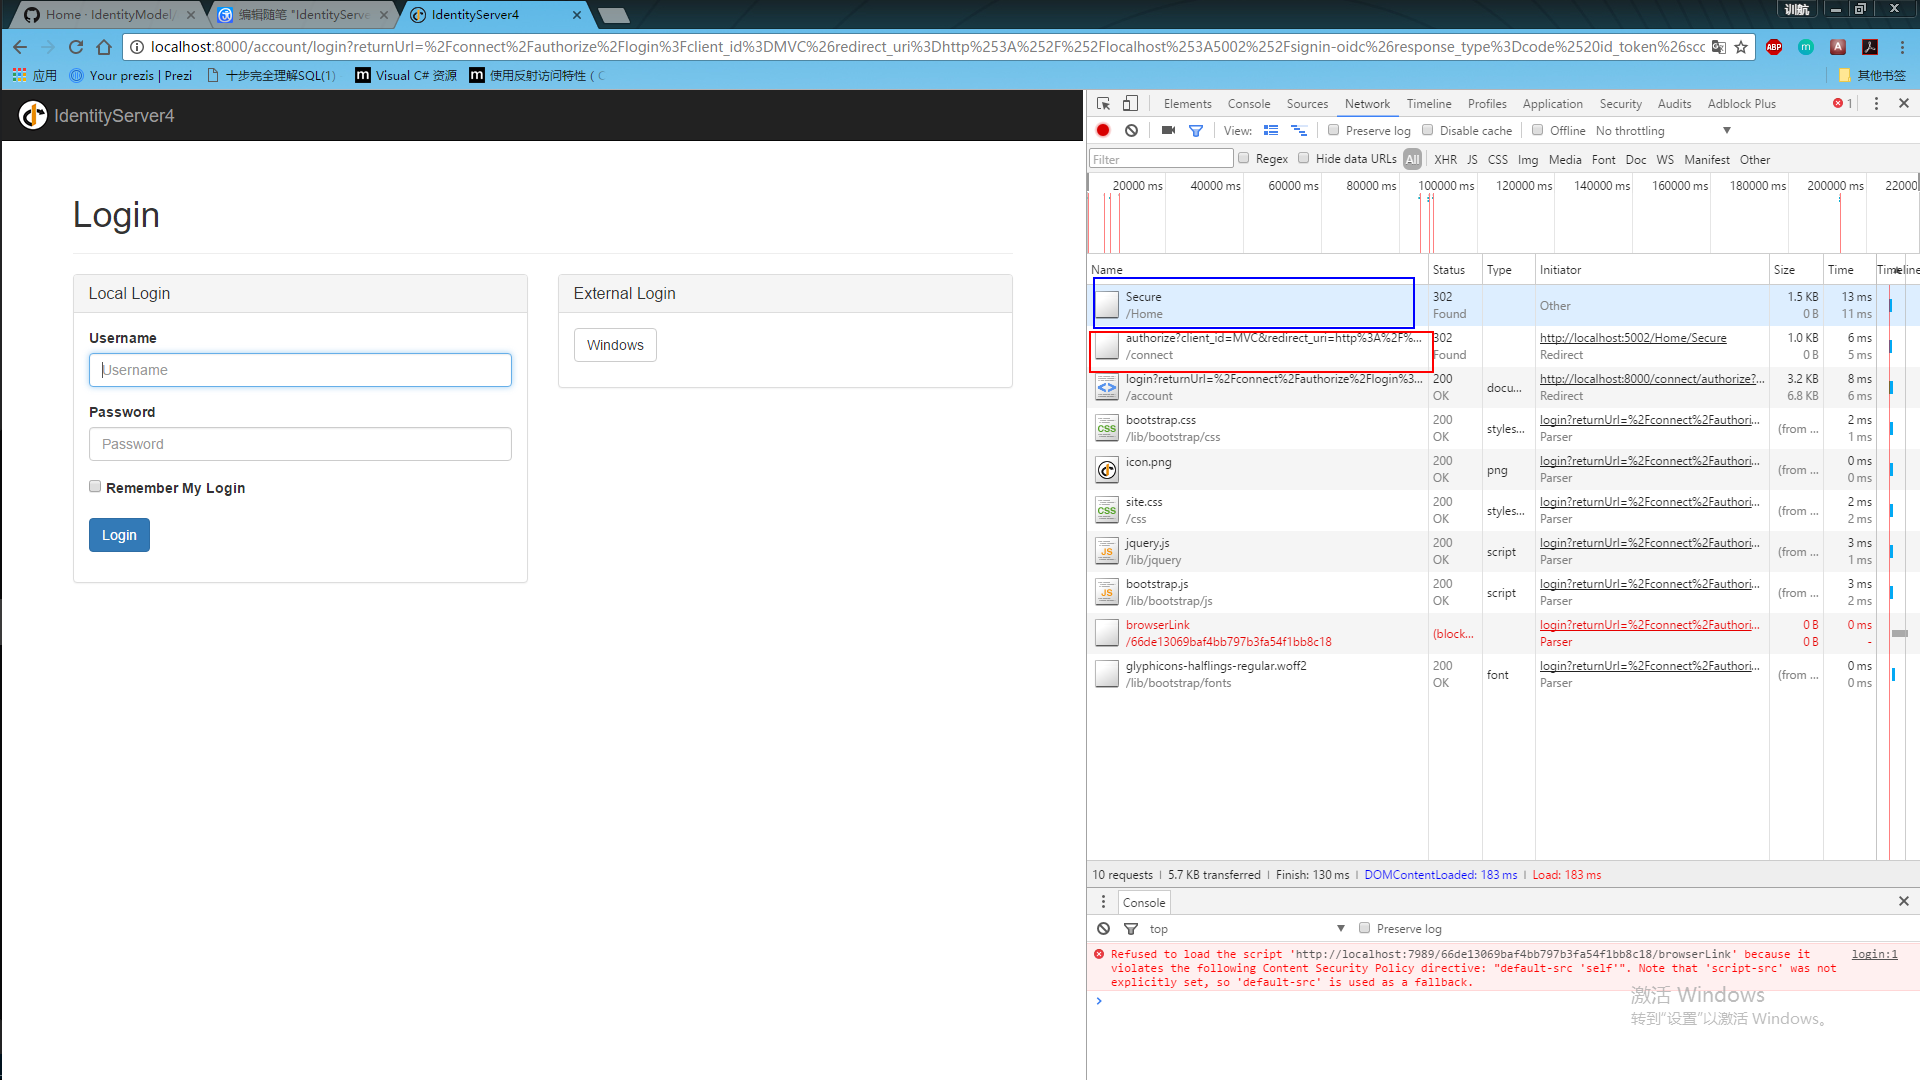
使用:
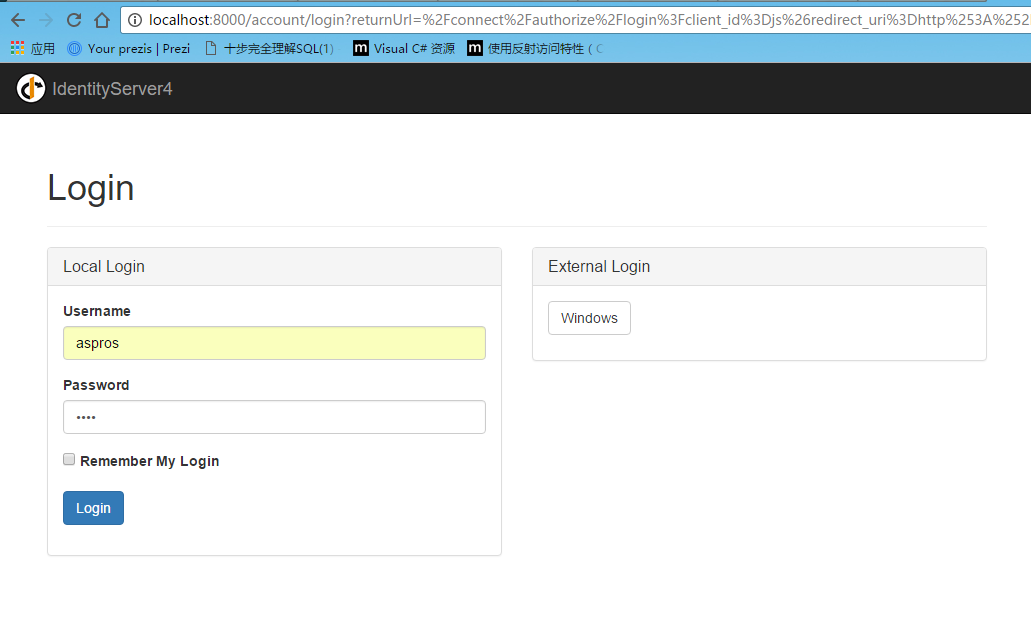
运行授权中心=》运行mvc客户端=》点击对应的授权的action链接=》跳转到授权中心登录页面=》输入账号密码后=》显示授权对应的权限列表=》跳回当前页面

以上。
js客户端访问
js端访问配置稍微麻烦点,因为中间出了一些问题,主要是前端js功力不够,看的的时候比较吃力
添加一个新项目。。先
在mvc端中,我们引用了一个库处理openid连接,在javascript中也需要引用一个类似的库
1.点击添加=》新建项=》左侧选择client-side选择NPM配置文件,默认为package.json
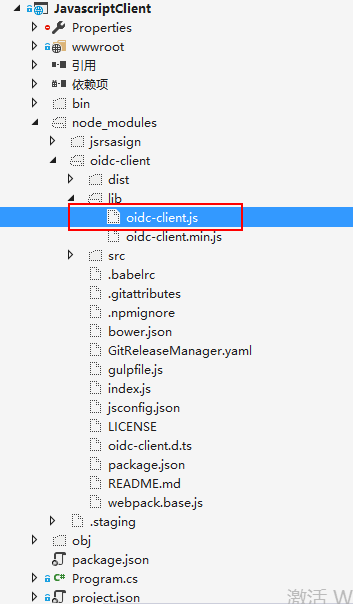
在package.json 里添加"oidc-client": "1.2.2",如下
{ "version": "1.0.0", "name": "asp.net", "private": true, "devDependencies": { "oidc-client": "1.2.2" }} 找到oidc-client.js文件,将文件复制到wwwroot下(注意html页面引用就行)
2.添加两个html
index.html
callBack.html
3.添加app.js
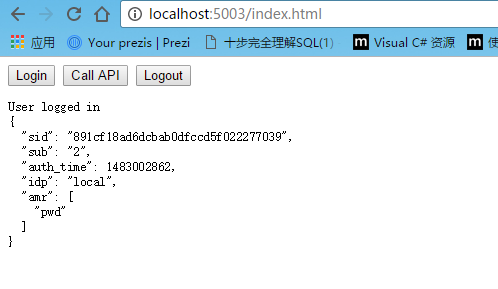
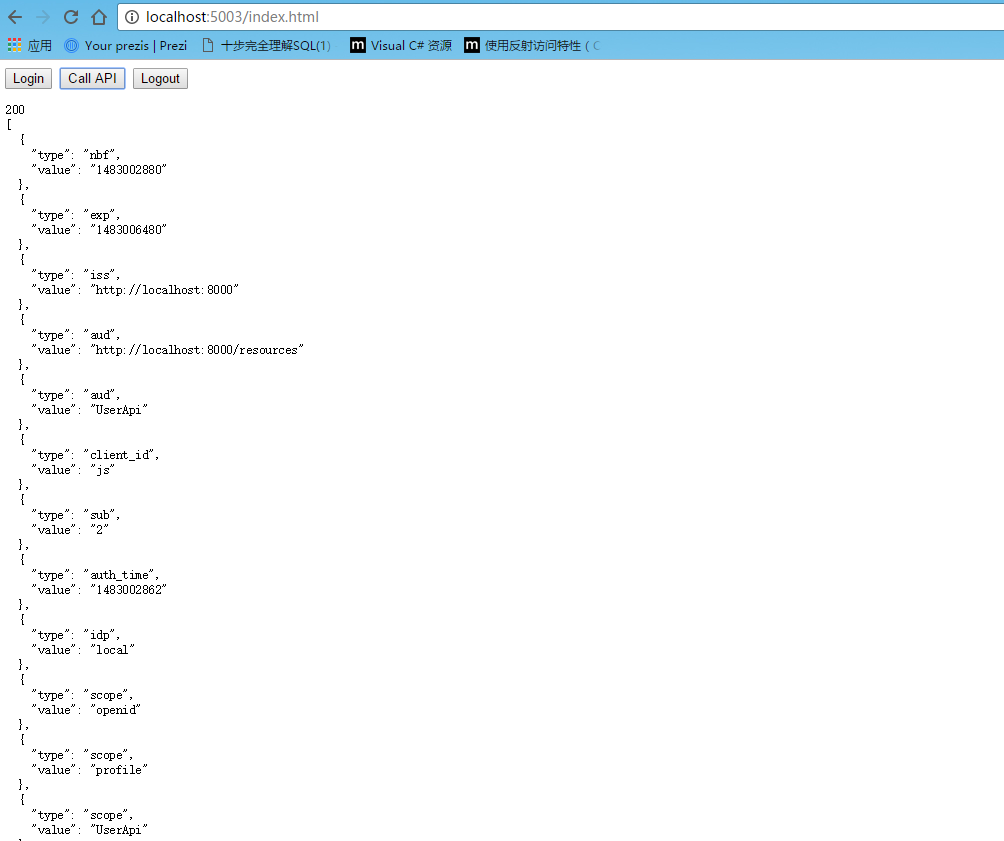
///function log() { document.getElementById('results').innerText = ''; Array.prototype.forEach.call(arguments, function (msg) { if (msg instanceof Error) { msg = "Error: " + msg.message; } else if (typeof msg !== 'string') { msg = JSON.stringify(msg, null, 2); } document.getElementById('results').innerHTML += msg + '\r\n'; });}document.getElementById("login").addEventListener("click", login, false);document.getElementById("api").addEventListener("click", api, false);document.getElementById("logout").addEventListener("click", logout, false);var config = { authority: "http://localhost:8000", client_id: "js", redirect_uri: "http://localhost:5003/callback.html", response_type: "id_token token", scope: "openid profile UserApi", post_logout_redirect_uri: "http://localhost:5003/index.html",};var mgr = new Oidc.UserManager(config);mgr.getUser().then(function (user) { if (user) { log("User logged in", user.profile); } else { log("User not logged in"); }});function login() { mgr.signinRedirect();}function api() { mgr.getUser().then(function (user) { var url = "http://localhost:5001/api/Values"; var xhr = new XMLHttpRequest(); xhr.open("GET", url); xhr.onload = function () { log(xhr.status, JSON.parse(xhr.responseText)); } xhr.setRequestHeader("Authorization", "Bearer " + user.access_token); xhr.send(); });}function logout() { mgr.signoutRedirect();}
4.将端口设为5003
运行授权中心=》运行javascriptclient=》点击login=》跳转到授权中心登录页面=》登录后,显示权限列表=》返回5003

以上
更新
看了昨天的评论,又去官方文档瞄了下,找到一些处理方法,如下
IdentityServer is designed for extensibility, and one of the extensibility points is the storage mechanism used for data that IdentityServer needs. This quickstart shows to how configure IdentityServer to use EntityFramework (EF) as the storage mechanism for this data (rather than using the in-memory implementations we had been using up until now).
大概意思是说,可以用数据库存储apiresour,client和identityserverresource 资源
新建或在原有的授权中心项目更改都是可以的,我这里是直接新建了一个
1.在project.json里 dependencies添加
"IdentityServer4.EntityFramework": "1.0.0",
"Microsoft.EntityFrameworkCore.SqlServer": "1.1.0", "Microsoft.EntityFrameworkCore.Tools": "1.0.0-preview2-final", "Microsoft.EntityFrameworkCore.SqlServer.Design": "1.1.*"tools里添加(用于执行cmd的donet ef命令)
"Microsoft.EntityFrameworkCore.Tools": "1.0.0-preview2-final"
2.新建config文件
using System.Collections.Generic;using IdentityServer4;using IdentityServer4.Models;using IdentityServer4.Test;namespace EntityFrameworkDemo{ public class Config { public static IEnumerable GetyIdentityResources() { return new List { new IdentityResources.OpenId(), new IdentityResources.Profile() }; } public static IEnumerable GeyApiResources() { return new List { new ApiResource("UserApi","用户API"), new ApiResource("api1","测试api") }; } public static IEnumerable GetClients() { return new List { new Client { ClientId = "Client", AllowedGrantTypes = GrantTypes.ClientCredentials, ClientSecrets = { new Secret("secret".Sha256()) }, AllowedScopes = { "UserApi"} }, new Client { ClientId = "ro.Client", AllowedGrantTypes = GrantTypes.ResourceOwnerPassword, ClientSecrets = { new Secret("secret".Sha256()) }, AllowedScopes = { "UserApi"} }, // OpenID Connect implicit flow client (MVC) new Client { ClientId = "MVC", ClientName = "MVC Client", AllowedGrantTypes = GrantTypes.HybridAndClientCredentials, ClientSecrets = { new Secret("secret".Sha256()) }, RedirectUris = { "http://localhost:5002/signin-oidc" }, PostLogoutRedirectUris = { "http://localhost:5002" }, AllowedScopes = { IdentityServerConstants.StandardScopes.OpenId, IdentityServerConstants.StandardScopes.Profile, "UserApi" }, AllowOfflineAccess = true }, // JavaScript Client new Client { ClientId = "js", ClientName = "JavaScript Client", AllowedGrantTypes = GrantTypes.Implicit, AllowAccessTokensViaBrowser = true, RedirectUris = { "http://localhost:5003/callback.html" }, PostLogoutRedirectUris = { "http://localhost:5003/index.html" }, AllowedCorsOrigins = { "http://localhost:5003" }, AllowedScopes = { IdentityServerConstants.StandardScopes.OpenId, IdentityServerConstants.StandardScopes.Profile, "UserApi" }, } }; } public static List GetTestUsers() { return new List { new TestUser { SubjectId = "1", Username = "qwerty", Password = "a123" }, new TestUser { SubjectId = "2", Username = "aspros", Password = "b123" } }; } }} 3.在startup里添加对应的服务
(1).修改ConfigureServices
旧:ConfigureServices里如下
services.AddIdentityServer() .AddTemporarySigningCredential() .AddInMemoryApiResources(Configs.GeyApiResources()) .AddInMemoryClients(Configs.GetClients()) .AddInMemoryIdentityResources(Configs.GetyIdentityResources()) .AddTestUsers(Configs.GeTestUsers());
新:ConfigureServices里如下
var connectionString = @"server=.;database=IdentityServer4;trusted_connection=yes"; var migrationsAssembly = typeof(Startup).GetTypeInfo().Assembly.GetName().Name; // configure identity server with in-memory users, but EF stores for clients and resources services.AddIdentityServer() .AddTemporarySigningCredential() .AddTestUsers(Config.GetTestUsers()) .AddConfigurationStore(builder => builder.UseSqlServer(connectionString, options => options.MigrationsAssembly(migrationsAssembly))) .AddOperationalStore(builder => builder.UseSqlServer(connectionString, options => options.MigrationsAssembly(migrationsAssembly)));
(2).修改Configure
app.UseIdentityServer(); app.UseCookieAuthentication(new CookieAuthenticationOptions { AuthenticationScheme = IdentityServerConstants.ExternalCookieAuthenticationScheme, AutomaticAuthenticate = false, AutomaticChallenge = false }); (3).初始化数据库
private void InitializeDatabase(IApplicationBuilder app) { using (var scope = app.ApplicationServices.GetService ().CreateScope()) { scope.ServiceProvider.GetRequiredService ().Database.Migrate(); var context = scope.ServiceProvider.GetRequiredService (); context.Database.Migrate(); if (!context.Clients.Any()) { foreach (var client in Config.GetClients().Where(client => !context.Clients.Any(c => c.ClientId == client.ClientId))) { context.Clients.Add(client.ToEntity()); } } //context.SaveChanges(); if (!context.IdentityResources.Any()) { foreach ( var identity in Config.GetyIdentityResources() .Where(identity => !context.IdentityResources.Any(i => i.Name == identity.Name))) { context.IdentityResources.Add(identity.ToEntity()); } } //context.SaveChanges(); if (!context.ApiResources.Any()) { foreach (var api in Config.GeyApiResources().Where(api => !context.ApiResources.Any(a => a.Name == api.Name))) { context.ApiResources.Add(api.ToEntity()); } } context.SaveChanges(); } } 在Configure添加初始化数据库方法
public void Configure(IApplicationBuilder app, IHostingEnvironment env, ILoggerFactory loggerFactory) { // this will do the initial DB population InitializeDatabase(app); ... } 4.在当前项目目录,如 G:\MyProject\IdentityServerDemo\src\EntityFrameworkDemo下shift+右键,在此处打开命令窗口,运行下面两行命令
dotnet ef migrations add InitialIdentityServerPersistedGrantDbMigration -c PersistedGrantDbContext -o Data/Migrations/IdentityServer/PersistedGrantDb
dotnet ef migrations add InitialIdentityServerConfigurationDbMigration -c ConfigurationDbContext -o Data/Migrations/IdentityServer/ConfigurationDb
5.重新运行授权中心前更改端口号为8001(如果是新建的项目),在sqlserver数据库会生成对应的数据库
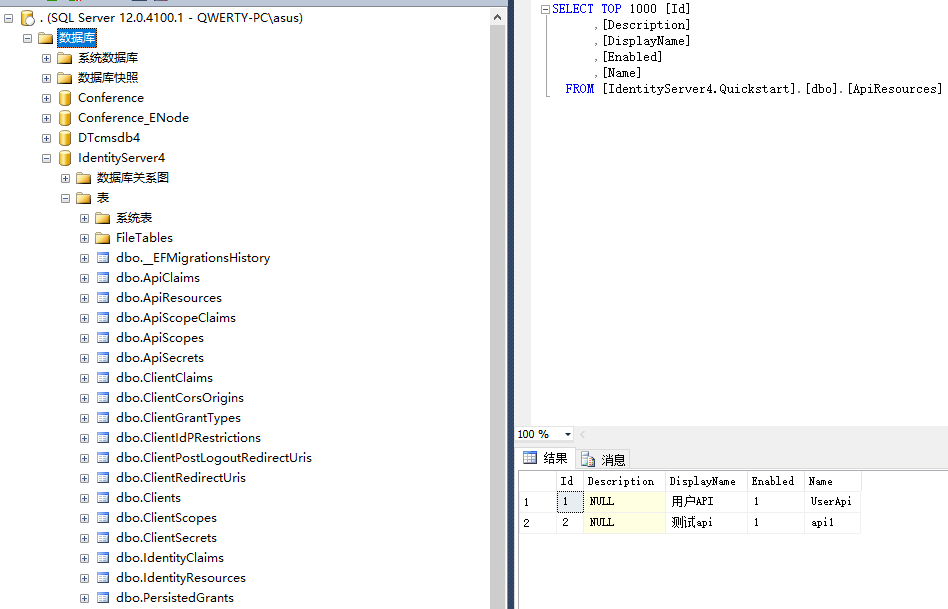
6.将api的授权地址改成8001
7.运行单元测试
以上
如有问题,欢迎指正。